Difference between revisions of "Experiment: Light"
(Created page with "thumb|The Light Experiment left The '''Light experiment''' is one of 12 experiments in the Laboratory. The goal...") |
|||
| (38 intermediate revisions by 14 users not shown) | |||
| Line 1: | Line 1: | ||
| − | + | '''NOTE: This is not complete information. Please help by editing this page or suggesting edits in the discord!''' | |
| − | + | ||
| − | The '''Light experiment''' is one of 12 experiments in the | + | |
| + | The '''Light experiment''' is one of 12 experiments in the [[laboratory]], available at laboratory tier 3. | ||
| + | |||
| + | The goal of the Light Experiment is to create images crafted from light particles. | ||
{{Clear|left}} | {{Clear|left}} | ||
| − | |||
| − | |||
| − | |||
| − | |||
| − | |||
| − | |||
| − | |||
| − | |||
| − | === | + | ==Grid== |
| − | + | ''Two light generators on the left side of the grid make beams of white light which can be split into the following colors:'' <br> | |
| + | Red <br> | ||
| + | Blue <br> | ||
| + | Green | ||
| + | |||
| + | |||
| + | ''Combining these colors makes new ones:''<br> | ||
| + | Cyan (blue + green) <br> | ||
| + | Yellow (red + green) <br> | ||
| + | Pink (blue + red) | ||
| + | |||
| + | |||
| + | ''Making these rays of light go into the receiver on the right side of the grid rewards us with light particles of the appropriate color.'' | ||
| + | |||
| + | Due to one of the prestige options (bottom left), a single color setup is best to use. | ||
| + | |||
| + | [[File:10 Ray Light Experiment.png|350px|left|thumb|The best setup without the collector objects]] | ||
| + | |||
| + | [[File:23 Ray Light Experiment.png|350px|left|thumb|The best known setup without the omni collectors (just remove them and replace with normal ones) | ||
| + | ]] | ||
| + | |||
| + | [[File:32 Ray Light Experiment.png|350px|left|thumb|The best known setup]] | ||
| + | |||
| + | {| class="wikitable" | ||
| + | |+An inelegant solution to the grid, to gain equal light of all colors. | ||
| + | (https://imgur.com/a/RT35lLT) | ||
| + | ! | ||
| + | | | ||
| + | | | ||
| + | | | ||
| + | |Mirror SE | ||
| + | | | ||
| + | |Splitter W | ||
| + | |Splitter E | ||
| + | |Splitter W | ||
| + | |- | ||
| + | ! | ||
| + | | | ||
| + | |Splitter E | ||
| + | |Splitter W | ||
| + | | | ||
| + | |Mirror SE | ||
| + | |Splitter W | ||
| + | |Splitter E | ||
| + | | | ||
| + | |- | ||
| + | !LED | ||
| + | |Mirror E | ||
| + | | | ||
| + | | | ||
| + | | | ||
| + | |Splitter SW | ||
| + | |Splitter W | ||
| + | | | ||
| + | | | ||
| + | |- | ||
| + | ! | ||
| + | | | ||
| + | | | ||
| + | | | ||
| + | | | ||
| + | | | ||
| + | | | ||
| + | |Mirror E | ||
| + | | | ||
| + | |- | ||
| + | ! | ||
| + | | | ||
| + | |Splitter E | ||
| + | | | ||
| + | |Prism | ||
| + | |Splitter W | ||
| + | |Mirror W | ||
| + | | | ||
| + | |Mirror W | ||
| + | |- | ||
| + | !LED | ||
| + | |Splitter W | ||
| + | | | ||
| + | |Mirror SE | ||
| + | | | ||
| + | |Splitter W | ||
| + | |Splitter E | ||
| + | | | ||
| + | |Splitter SE | ||
| + | |- | ||
| + | ! | ||
| + | |Mirror E | ||
| + | |Splitter E | ||
| + | |Prism | ||
| + | |Splitter SE | ||
| + | |Mirror N | ||
| + | | | ||
| + | | | ||
| + | | | ||
| + | |- | ||
| + | ! | ||
| + | | | ||
| + | |Splitter E | ||
| + | |Mirror NW | ||
| + | | | ||
| + | |Mirror N | ||
| + | | | ||
| + | |Mirror N | ||
| + | | | ||
| + | |} | ||
| + | |||
| + | ==Objects== | ||
| + | ===Purchasable objects:=== | ||
| + | {| class="wikitable" | ||
| + | !Component!!Cost!!Description | ||
| + | |- | ||
| + | !Mirror | ||
| + | |100 | ||
| + | |Reflects light off of its surface based on its angle of incidence | ||
| + | |- | ||
| + | !Filter: Red | ||
| + | |1000 | ||
| + | |Only lets red particles pass through itself. Blocks light entirely if it tries to enter it sideways. | ||
| + | |- | ||
| + | !Filter: Green | ||
| + | |1000 | ||
| + | |Only lets green particles pass through itself. Blocks light entirely if it tries to enter it sideways. | ||
| + | |- | ||
| + | !Filter: Blue | ||
| + | |1000 | ||
| + | |Only lets blue particles pass through itself. Blocks light entirely if it tries to enter it sideways. | ||
| + | |- | ||
| + | !Prism | ||
| + | |12500 | ||
| + | |Splits light into its components. White into red, blue and green. Beams made of 2 colors into original colors, but the prism releases the rays of light at a diagonal angle. | ||
| + | |- | ||
| + | !Splitter/Merger | ||
| + | |10B | ||
| + | |Redirects the ray that enters this component at the input side towards both output sides, effectively copying it. If used in reverse it can merge two rays into one, creating a new color if two different input colors are used. | ||
| + | |- | ||
| + | !Directional Consumer | ||
| + | |1No | ||
| + | |Acts as a consumer for light rays and therefore produces light particles when a light ray hits its entry point. | ||
| + | |- | ||
| + | !Omni-Collector | ||
| + | |10DDe | ||
| + | |Works like a directional light consumer except that every single direction is an entry point for light. | ||
| + | |} | ||
| + | |||
| + | ===Components Advice=== | ||
| + | |||
| + | ====Mirror==== | ||
| − | + | The mirror bounces light at 90° to the angle it came in by if at an angle or back the way it came if hit head on. | |
| − | |||
| − | |||
| − | |||
| − | ===Prestige== | + | '''Important note:''' The mirror is single-sided. Ensure that the white side is the side hit by the light or the light will terminate instead of bounce. |
| − | + | ||
| + | ====Filters (Red, Green, Blue)==== | ||
| + | |||
| + | Each filter lets through only one primary colour. This turns white light into that colour or removes one half of a secondary color from a beam. In some cases, it might be better to use a prism to split the light rather than filter it. | ||
| + | |||
| + | ==Prestige== | ||
| + | |||
| + | Improvement: Increases light production by 75% <br> | ||
| + | Improvement: Increases total light production by 12% per light ray hitting a receiver <br> | ||
| + | Improvement: Reduces amount of light required for each image by 35% <br> | ||
| + | |||
| + | First prestige is at 100k; | ||
| + | Prestige Formula: 100000 * 10<sup>Prestige lvl</sup> | ||
| + | <br>!!(requires change to pictures instead of points and change to the formula too)!! <br> | ||
==Rewards== | ==Rewards== | ||
{| class="wikitable" | {| class="wikitable" | ||
| − | ! | + | !Images!!Reward |
| + | |- | ||
| + | !1 | ||
| + | |{{Module|Offensive|size=30px}} Light Taste | ||
| + | |- | ||
| + | !3 | ||
| + | |{{Module|Defensive|size=30px}} Dispel | ||
|- | |- | ||
| − | ! | + | !5 |
| − | | | + | |{{Module|Defensive|size=30px}} Dryness Aura |
|- | |- | ||
| − | ! | + | !10 |
| − | | | + | |{{Module|Utility|size=30px}} Recharge |
|- | |- | ||
| − | ! | + | !Varies |
| − | | | + | | +% Light damage |
|- | |- | ||
| − | ! | + | !201 |
| − | | | + | | +200% Light damage (max) |
|- | |- | ||
| − | ! Varies | + | !Varies |
| − | | +% | + | | +% Light resistance |
|- | |- | ||
| − | ! | + | !199 |
| − | | +% | + | | +99% Light resistance |
|} | |} | ||
{{Navbox experiments|state=expanded}} | {{Navbox experiments|state=expanded}} | ||
{{PerfectNavigation}} | {{PerfectNavigation}} | ||
Latest revision as of 17:17, 6 April 2025
NOTE: This is not complete information. Please help by editing this page or suggesting edits in the discord!
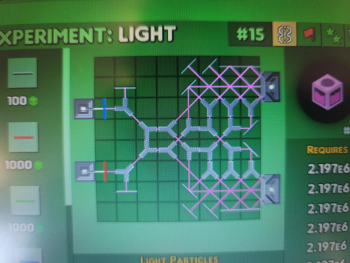
The Light experiment is one of 12 experiments in the laboratory, available at laboratory tier 3.
The goal of the Light Experiment is to create images crafted from light particles.
Contents
Grid
Two light generators on the left side of the grid make beams of white light which can be split into the following colors:
Red
Blue
Green
Combining these colors makes new ones:
Cyan (blue + green)
Yellow (red + green)
Pink (blue + red)
Making these rays of light go into the receiver on the right side of the grid rewards us with light particles of the appropriate color.
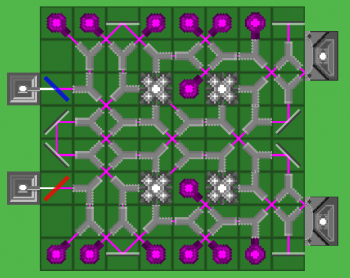
Due to one of the prestige options (bottom left), a single color setup is best to use.
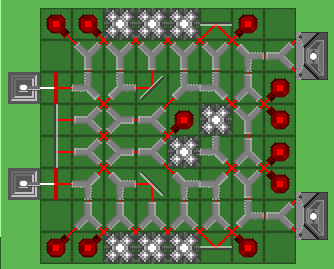
| Mirror SE | Splitter W | Splitter E | Splitter W | |||||
| Splitter E | Splitter W | Mirror SE | Splitter W | Splitter E | ||||
| LED | Mirror E | Splitter SW | Splitter W | |||||
| Mirror E | ||||||||
| Splitter E | Prism | Splitter W | Mirror W | Mirror W | ||||
| LED | Splitter W | Mirror SE | Splitter W | Splitter E | Splitter SE | |||
| Mirror E | Splitter E | Prism | Splitter SE | Mirror N | ||||
| Splitter E | Mirror NW | Mirror N | Mirror N |
Objects
Purchasable objects:
| Component | Cost | Description |
|---|---|---|
| Mirror | 100 | Reflects light off of its surface based on its angle of incidence |
| Filter: Red | 1000 | Only lets red particles pass through itself. Blocks light entirely if it tries to enter it sideways. |
| Filter: Green | 1000 | Only lets green particles pass through itself. Blocks light entirely if it tries to enter it sideways. |
| Filter: Blue | 1000 | Only lets blue particles pass through itself. Blocks light entirely if it tries to enter it sideways. |
| Prism | 12500 | Splits light into its components. White into red, blue and green. Beams made of 2 colors into original colors, but the prism releases the rays of light at a diagonal angle. |
| Splitter/Merger | 10B | Redirects the ray that enters this component at the input side towards both output sides, effectively copying it. If used in reverse it can merge two rays into one, creating a new color if two different input colors are used. |
| Directional Consumer | 1No | Acts as a consumer for light rays and therefore produces light particles when a light ray hits its entry point. |
| Omni-Collector | 10DDe | Works like a directional light consumer except that every single direction is an entry point for light. |
Components Advice
Mirror
The mirror bounces light at 90° to the angle it came in by if at an angle or back the way it came if hit head on.
Important note: The mirror is single-sided. Ensure that the white side is the side hit by the light or the light will terminate instead of bounce.
Filters (Red, Green, Blue)
Each filter lets through only one primary colour. This turns white light into that colour or removes one half of a secondary color from a beam. In some cases, it might be better to use a prism to split the light rather than filter it.
Prestige
Improvement: Increases light production by 75%
Improvement: Increases total light production by 12% per light ray hitting a receiver
Improvement: Reduces amount of light required for each image by 35%
First prestige is at 100k; Prestige Formula: 100000 * 10Prestige lvl
!!(requires change to pictures instead of points and change to the formula too)!!
Rewards
| Images | Reward |
|---|---|
| 1 | |
| 3 | |
| 5 | |
| 10 | |
| Varies | +% Light damage |
| 201 | +200% Light damage (max) |
| Varies | +% Light resistance |
| 199 | +99% Light resistance |


